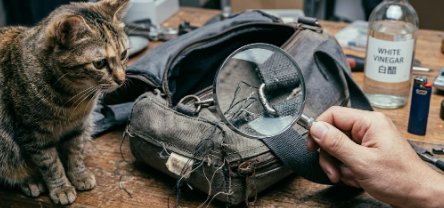
The worst carrier I ever bought had so many loose threads I could have knitted a sweater. When I opened the shipping bag and looked inside the lining – there were seven or eight threads dangling next to the zipper, the longest nearly four inches. The seams had raw edges, like uncut draft paper. I thought, “I’ll just trim them.” Two weeks later, the stitching around the zipper started unraveling – from a few loose threads to a gaping hole.
The second carrier was even worse. The silver buckles looked nice, but after a week, rust spots appeared on the surface, rough and scratchy to the touch. Once, at the entrance of a pet store, the buckle seized up completely. I couldn’t open it, and my cat was pacing anxiously inside. The third carrier had its shoulder strap snap after a month – luckily at home, so the cat wasn’t hurt.
Those three carriers together cost less than $30. But the “tuition” I paid was far more than that – the thread‑ridden carrier embarrassed me at the airport, the rusty carrier humiliated me at the pet store, and the broken strap left me with lingering fear.
Later, I developed a “receiving inspection checklist” that weeds out 90% of cheap carriers in five minutes. If you don’t want to pay this stupidity tax, just follow these steps.
Table of Contents
The Stupidity Tax I Paid: Loose Threads, Rust, Broken Strap
Data‑Backed: Lessons from 432 “Zipper Damage” + 108 “Poor Workmanship” Reviews
Receiving Inspection Checklist: Step 1 Smell, Step 2 Look, Step 3 Feel, Step 4 Pull
Return & Exchange Tips: Keep Packaging, Take Photos, Act Within 7 Days
Simple Fixes: Burn Threads, Use White Vinegar on Rust
Frequently Asked Questions
Conclusion: Five Minutes of Inspection Saves a Year of Trouble
The Stupidity Tax I Paid: Loose Threads, Rust, Broken Strap
Thread carrier: It cost under $15 and looked decent in the pictures. When it arrived, I looked inside the lining – there were loose threads everywhere: around the zipper, at the mesh seams, at the strap attachment points. The longest one dangled from the lining like an uncut clothing tag. I trimmed them. A month later, the stitching around the zipper started coming undone, one thread at a time, until the whole zipper hung loosely from the carrier.
Rusty carrier: The hardware was shiny silver and looked high‑end. After a week, rust spots appeared on the buckles. A few days later, the rust had spread, making the surface rough and sharp. The most embarrassing moment was at the entrance of a pet store – the buckle seized up, and I couldn’t open it no matter what. The cat was pacing anxiously inside. In the end, I had to borrow a key from a stranger to pry it open.
Broken strap carrier: The stitching at the shoulder strap attachment gave way. Luckily, it happened at home – the carrier slid off my shoulder and hit the floor, but the cat wasn’t hurt. After that, I never bought a carrier under $15 again.
In negative reviews, I saw countless similar experiences:
“Loose threads, very plastic‑y fabric.”
“Feels cheap.”
“Poor quality overall.”
“Feels cheap” – that phrase translates to: nothing about it is acceptable.
Data‑Backed: Lessons from 432 “Zipper Damage” + 108 “Poor Workmanship” Reviews
Among the 5,000+ negative reviews I analyzed, “zipper damage” appeared about 432 times, and “poor workmanship / poor quality” about 108 times. Here is the breakdown of common problems:
| Problem Type | Frequency | Typical Manifestation |
|---|---|---|
| Loose threads | ~35% | Many untrimmed threads in lining and seams |
| Rusty hardware | ~28% | Buckles and zipper pulls rust within a week, get stuck |
| Strap stitching failure | ~22% | Load‑bearing stitches come undone, strap detaches |
| Print peeling | ~15% | Surface pattern flakes off, fades |
What the data shows: Cheap carriers save money on things you don’t see – they skip thread‑trimming, skip anti‑rust treatment, and cut corners on double stitching. Those “savings” end up becoming your headaches.
Receiving Inspection Checklist: Step 1 Smell, Step 2 Look, Step 3 Feel, Step 4 Pull
When you receive a new carrier, spend 5 minutes doing these four checks. It will filter out 90% of cheap carriers.
Step 1: Smell
As soon as you open the shipping bag, smell the carrier.
- Strong chemical / plastic / glue smell → × poor quality material – return it immediately. (Refer to the “new cat carrier plastic smell removal” article: if the smell doesn’t dissipate after three days of airing, it’s a material defect.)
- Mild or no smell → √ normal – proceed to the next step.
Step 2: Look
Flip the carrier inside out and inspect the lining, seams, and areas around the zipper.
What to look for:
- Number of loose threads: more than 3 threads longer than 3cm → × poor quality control – pass.
- Raw seam edges: are the fabric edges bound with tape or left exposed? Exposed raw edges unravel easily.
- Stitching uniformity: is the stitch spacing consistent? Any crooked or skipped stitches?
- Missed stitches: some cheap carriers have sections that were never sewn at all.
My standard: Turn the lining inside out – if the stitching is neat, there are no more than 2 loose threads, and all seams are bound → √ pass.
Step 3: Feel
Use your hands to feel the key parts of the carrier.
What to feel for:
- Zipper pull: is it smooth and rounded? Any burrs or sharp edges? √ smooth is good; × burrs are bad.
- Hardware (buckles, clips): is the surface smooth? Any rust spots, scratches, or burrs? √ smooth is good; × rust is bad.
- Fabric: does it feel smooth and nice (quality nylon), or rough, stiff, like umbrella fabric (cheap polyester)? √ quality nylon; × cheap polyester.
My experience: Burrs on cheap hardware can scratch your hands – and could also scratch your pet. Run your fingernail across the buckle surface. If it leaves white powder or scratch marks, the coating is very poor.
Step 4: Pull
Test the structural strength and durability of the carrier.
What to pull:
- Strap attachment point: pull firmly on the shoulder strap where it connects to the carrier body. If it doesn’t budge and the stitching doesn’t deform → √ ok. If there is noticeable looseness or the stitching gaps → × poor load capacity – pass.
- Zipper smoothness: zip back and forth three times. Smooth and not catching → √ ok. If it catches, snags fabric, or derails → × poor zipper quality – pass.
- Base board: press the bottom of the carrier with your palm. If it feels supportive and doesn’t depress easily → √ ok. If it collapses under pressure and feels soft → × no rigid base or cardboard base – pass.
Special note: If the strap attachment is single‑stitch (only one line of stitching), the load capacity is very poor. At a minimum, look for double stitching – preferably X‑shaped reinforcement.
Return & Exchange Tips: Keep Packaging, Take Photos, Act Within 7 Days
If you find problems with the carrier, follow these steps:
1. Keep the original packaging and tags
Do not throw away the shipping bag, box, or hang tags. Returns require original packaging. If you cut off the tags, you may not be able to return it.
2. Take photos as evidence
- Loose threads: take close‑ups showing the number and length of threads.
- Rusty hardware: photograph the rust spots, ideally with a finger for scale.
- Broken strap stitching: photograph where the seam came undone.
- Zipper catching: a short video can be helpful.
3. Act within 7 days
Most online platforms have a “7‑day no‑reason return” policy starting from the day you receive the item. Don’t delay – apply for a return the same day or the next day after discovering the problem.
4. How to write the return reason
Do not write “didn’t like it” or “ordered by mistake.” Write “Quality issue: loose threads / rusty hardware / zipper catching.” Attach your photos. For quality issues, the seller usually covers return shipping.
5. If the seller refuses
Request platform mediation. Upload your photos and chat records. The platform will almost always side with the buyer.
Simple Fixes: Burn Threads, Use White Vinegar on Rust
If the carrier’s problems are minor (e.g., just a few loose threads, slight rust) and you don’t want to return it, you can fix them yourself.
Loose threads: use a lighter (be careful not to burn the fabric)
How to do it:
- Use the blue outer flame of a lighter to quickly pass over the thread end.
- The thread (synthetic) will melt into a small bead, which prevents further unraveling.
- Caution: Don’t hold the flame too long (it will scorch the fabric). Don’t use the yellow flame (produces more smoke and odor).
Alternative: Trim the thread with nail clippers, then dab a tiny amount of clear nail polish on the cut end to prevent unraveling.
Rusty hardware: use white vinegar
How to do it:
- Pour a little white vinegar into a small dish, dip a cotton swab in it.
- Apply to the rusted hardware surface and let sit for 5‑10 minutes.
- Gently scrub with an old toothbrush – the rust will come off.
- Wipe clean with a damp cloth, then dry thoroughly.
Result: Removes about 80% of light rust. Severe rust (penetrating the metal) cannot be repaired – return the carrier.
Note: Vinegar slightly corrodes metal. After treatment, wipe completely dry. Do not use inside the zipper track (may damage the lubrication).
Frequently Asked Questions
Q: Do loose threads always mean the carrier will unravel?
A: Not always. But loose threads are a sign of poor quality control – a factory that doesn’t bother trimming surface threads likely cuts corners on internal workmanship as well. In areas with loose threads, the stitching tension may be uneven, making unraveling more likely.
Q: Can I still use hardware that has rusted?
A: Light rust doesn’t affect function immediately, but it will get worse. After treating with white vinegar, you can continue using it. If the rust causes the buckle to seize or break, it must be replaced.
Q: Can I repair a torn strap attachment myself?
A: Yes. Use a thick needle and nylon thread to add an X‑stitch over the original attachment. Caution: If the carrier fabric itself is very thin (common with cheap carriers), the fabric may tear under tension even with reinforced stitching. In that case, it’s better to replace the carrier.
Q: How can I tell whether a carrier has “occasional loose threads” or “overall poor workmanship”?
A: Look at multiple areas. If there are only one or two loose threads and the rest of the stitching is neat and seams are bound, it may be an accident. If the lining, seams, zipper area, and strap attachments all have loose threads and raw edges, then it’s overall poor workmanship.
Q: Are there carriers with “zero loose threads”?
A: Yes. Quality brands have a “thread‑trimming” step before shipping – even when you turn the lining inside out, you’ll see almost no loose threads. Such carriers usually cost $30 or more. But “fewer loose threads” doesn’t always mean “better quality” – you also need to check stitching, hardware, and the base board.
Conclusion: Five Minutes of Inspection Saves a Year of Trouble
The three carriers I paid stupidity tax on cost less than $30 in total. But the money I saved bought me embarrassment and fear. Later, I learned this “receiving inspection checklist” and haven’t bought a carrier that needed returning since.
Remember the four steps:
- Smell: strong chemical smell → × return it.
- Look: loose threads, stitching, seams.
- Feel: zipper pull, hardware, fabric.
- Pull: strap attachment, zipper, base board.
Spending five minutes to inspect a carrier saves months of trouble. If you find problems, don’t hesitate – return it. You’re not just buying a carrier – you’re buying your pet’s “safe transport” on the road. Every stitch, every buckle of that carrier is about safety and trust.
Don’t let “feels cheap” be the start of your next pitfall.
What’s the worst pet carrier you’ve ever bought? Share your “stupidity tax” story in the comments.
Leave a Reply
You must be logged in to post a comment.