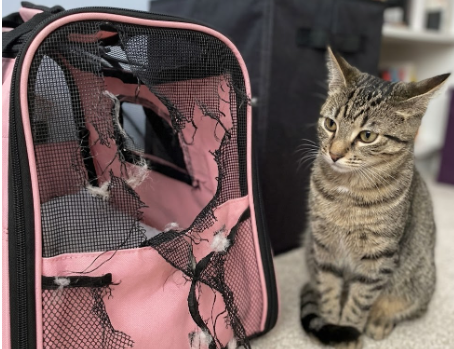
The morning Luna shredded her first cat carrier, I looked at the fist‑sized hole and thought only one thing: throw it away and buy a new one.
That carrier was less than a month old. Luna had torn a gash right through the mesh, leaving frayed threads dangling. I stood by the trash can, hesitated – the rest of the carrier was still fine: the rigid base wasn’t damaged, the zipper worked smoothly, only the mesh was broken. It felt like a waste to toss it.
Later, I searched online and found many people had the same problem. Some threw the carrier away and bought a new one; others fixed it themselves. I learned the most basic needle‑and‑thread repair. It wasn’t pretty, but it worked. Then I tried repair patches – after patching, it looked like new. That carrier is still in use today. Luna has scratched the same spot a few more times, but the repaired area is even stronger than the original.
Today, I’ll share four mesh repair methods I’ve tried. Next time your cat shreds a carrier, don’t rush to throw it away.
Table of Contents
Luna’s Masterpiece: A Hole Nearly Condemned the Carrier
Data‑Backed: Mesh Damage Is One of the Most Common Complaints
Needle & Thread Method: Sew Small Holes Yourself
Hot Glue Repair: Quick Emergency Fix
Patch Method: Most Recommended – Neat and Durable
Full Mesh Replacement: For Large Damage – Use a Professional Shop
Frequently Asked Questions
Conclusion: A Little Repair Makes It Last Much Longer
Luna’s Masterpiece: A Hole Nearly Condemned the Carrier
That carrier was my everyday go‑to: rigid base, ventilation on three sides, removable liner. Everything was good except the mesh was a bit thin. One night, for whatever reason, Luna went to town on the side mesh. The next morning, I saw the hole – angry and heartbroken at the same time.
Later, when I read negative reviews, I found I wasn’t alone. One person wrote:
“My cat shredded the mesh on the first night. I didn’t even get to use it.”
Another:
“Noticed it was ripped along the seam after only a few uses.”
And someone had their cat’s claw do a “targeted breakthrough”:
“My cat’s claw got caught in the mesh and pulled out a thread. Then it just unraveled from there.”
Those comments made me realize: mesh damage is one of the most common ways a cat carrier “dies.” But many people don’t know that most damage can be repaired.
Data‑Backed: Mesh Damage Is One of the Most Common Complaints
When I analyzed negative reviews earlier, there were many specifically about “mesh damage” or “seam splitting.” The problem distribution looks something like this:
| Cause of Damage | Typical Description |
|---|---|
| Cat scratching | Claw hooked into the mesh, tearing it |
| Normal wear and tear | Mesh thinning, getting fuzzy, eventually a hole |
| Seam failure | Stitching between mesh and fabric comes undone |
Mesh damage isn’t always the cat’s fault – some carriers have poor‑quality mesh that gets fuzzy and thin after only a few uses. But whatever the cause, as long as the damaged area isn’t huge, it can almost always be repaired.
Needle & Thread Method: Sew Small Holes Yourself
This is the most basic method, good for small holes (under 3cm in diameter) or seam separation.
Tools needed
- Thick needle (the kind for jeans, with a large eye)
- Nylon thread (cotton thread isn’t strong enough; nylon is best)
- Lighter
Steps
- Clean the edges of the hole: Trim away loose threads; don’t leave fuzzy edges.
- Align the torn edges: Pull the two sides of the hole together. If the hole is too large to align, place a small piece of backing fabric underneath.
- Sew with a whipstitch: Start from the outside edge, stitching in a circle. Pass the needle through the mesh openings. Keep stitches 3–5mm apart – too tight is time‑consuming, too loose is weak.
- Tie off: Make two tight knots on the back side.
- Melt the thread ends: Quickly pass the lighter flame over the cut ends. Nylon melts into a small ball that locks the knot – it will never come undone. Be careful not to burn the mesh.
My experience: My first sewing attempt was crooked, but it held for two weeks without coming undone. With practice, the results became much neater. The downside is that the sewn area becomes stiffer than the surrounding mesh – but that also means when the cat scratches that spot again, the threads clog the mesh holes and it’s harder to tear.
Best for
- Holes under 3cm in diameter
- Seam separation
- When you don’t have a repair patch and need an immediate fix
Pros: Almost zero cost, tools are commonly available at home
Cons: Not very pretty, requires some patience
Hot Glue Repair: Quick Emergency Fix
If you have a hot glue gun, this is the fastest repair method.
Tools needed
- Hot glue gun
- Hot glue sticks (clear or black, matching the carrier color)
Steps
- Preheat the glue gun (usually 3–5 minutes).
- Apply glue to the hole: Apply from the inside of the hole, covering about 1cm around the damaged area. Don’t apply too much – a thin layer is enough.
- Press flat quickly: Place a piece of parchment paper (or aluminum foil) over the glue, then press with your hand or a flat‑bottomed cup. Work fast – hot glue sets in seconds.
- After it cools, peel off the parchment paper.
My experience: Once, right before going out, I found a small hole the cat had made. I didn’t have time to sew, so I dabbed it with hot glue. The whole process took less than two minutes. After it hardened, it felt soft, and the cat didn’t bother it. However, after about a month, the edges of the glue started lifting – hot glue isn’t as durable as stitching or patches.
Best for
- Emergency fix (you need to leave immediately)
- Very small holes (under 1cm)
- When you don’t want to sew or use a patch
Pros: Very fast, waterproof
Cons: Not long‑lasting (may come off after a few months), the glue becomes stiff and may be uncomfortable for your pet to lie against
Patch Method: Most Recommended – Neat and Durable
After trying several methods, this is the one I recommend most. It’s simple, looks good, and lasts.
Materials needed
- Nylon repair patch (search online for “tent repair patch” or “nylon patch sticker”)
- Or use nylon webbing (2–3cm wide)
- Scissors
Repair patches usually have a self‑adhesive backing – just peel and stick. They come in clear (barely noticeable) or colors (can be decorative).
Steps
- Cut the patch: Cut the patch into a circle or oval (square corners tend to lift). Make it 2–3cm larger than the hole in all directions.
- Clean: Wipe the mesh around the hole with a wet wipe and let it dry.
- Stick: Peel off the backing and apply the patch. Press from the center outward to remove air bubbles.
- Press firmly: Press for 30 seconds to ensure good adhesion. Keep the area dry for 24 hours.
My experience: I used a clear repair patch on a hole Luna made. After applying it, you could barely see it. That carrier lasted another half‑year, and the patch never moved. The patched area was even stronger than the original mesh – Luna scratched the same spot a few more times, leaving only marks, but no new hole.
If you can’t find a repair patch, nylon webbing works too. Cut a small piece of webbing and glue it over the hole on both the inside and outside (like a sandwich) using a strong adhesive like E6000. The downside is that the glue has a smell and needs a day to air out.
Best for
- Holes of various sizes (as long as they’re not huge)
- Seam separation (use a long, thin patch)
- When you want a neat appearance
Pros: Good looking, durable, easy to apply, can be decorative (e.g., a little fish sticker)
Cons: You need to buy patches (very inexpensive – one sheet can be used many times)
Full Mesh Replacement: For Large Damage – Use a Professional Shop
If the hole is larger than half a palm, or the mesh is old, brittle, and has multiple holes, repairing it yourself isn’t cost‑effective. In that case, consider having the entire mesh panel replaced.
Where to go
- Clothing alteration shop (they usually have industrial sewing machines)
- Shoe repair shop (some also repair bags)
- Luggage repair shop
Cost
- Typically between a modest to moderate fee, depending on the size of the carrier and the mesh material.
My experience: I had a carrier whose side mesh was shredded in multiple places. I took it to an alteration shop. The seamstress removed the old mesh, cut a new piece (I provided heavy‑duty mesh fabric), and sewed it on. The cost was reasonable, and the carrier lasted another two years.
Best for
- Holes larger than 10cm in diameter
- Multiple holes – patching each one is impractical
- Mesh that has become brittle with age
Pros: Like new, and you can choose better mesh than the original
Cons: Costs money and takes time; such shops may not be available everywhere
Frequently Asked Questions
Q: After I repair it, will my cat scratch the same spot again?
A: Possibly. But the repaired area is stronger than before – the stitching or patch fills the mesh openings, making it harder for claws to hook in. If your cat targets the same spot repeatedly, you can add another patch on top for double protection.
Q: Can a cat pull off a repair patch?
A: Good quality self‑adhesive patches are very strong – even hard to remove by hand. The one I used stayed on for over half a year. However, if your cat deliberately chews the edges, they may eventually lift. I recommend stitching around the edge of the patch for extra security.
Q: Is hot glue safe for cats?
A: Once hardened, hot glue is solid and non‑toxic. A cat occasionally licking it is not a problem. But don’t let your cat touch it while it’s still hot or wet. If your cat has a habit of chewing on things, hot glue is not recommended – they might bite off a piece and swallow it.
Q: Can I use the carrier with a small hole in the mesh without repairing it?
A: Not recommended. A small hole will get larger as the cat scratches it. Also, if the hole is near the opening, the cat might squeeze through it. On that bus trip when Luna almost escaped, it was a broken zipper rather than a mesh hole – but the principle is the same: any opening in the carrier is a potential safety hazard.
Q: Is there any way to prevent a cat from scratching the mesh in the first place?
A: Yes. Several methods:
- Trim your cat’s nails regularly (simplest and most effective).
- Stick double‑sided tape around the outside of the carrier (cats don’t like the sticky feeling).
- Buy a scratch‑resistant carrier (double‑layer mesh, recessed mesh).
- Use a removable outer cover for the carrier (put it on when not in use).
But none of these will stop a cat that is truly determined to scratch. Learning how to repair is the ultimate solution.
Conclusion: A Little Repair Makes It Last Much Longer
When Luna shredded her first carrier, I almost threw it away. Now I’m glad I didn’t. After repairing it, that carrier lasted another year – it only retired when the zipper finally broke.
Mesh damage is not a death sentence. A small hole takes ten minutes to sew or patch. A separated seam, stitched back with a whipstitch along the original line, becomes stronger than new.
I now keep a small repair patch and a length of nylon thread in my bag. The next time Luna tears the mesh, I can fix it on the spot. No anxiety, no throwing carriers away – the money I save buys a lot of cat food.
Has your cat ever shredded a carrier? How did you repair it? Share your tips in the comments.
Leave a Reply
You must be logged in to post a comment.