In the corner of my balcony lies a gray‑blue foldable carrier. It has been with me for two years – it’s been to the beach, back to my Midwest hometown, squeezed onto trains, and stuffed under airplane seats. But last month, when I pulled it out of the cupboard, it wouldn’t stand up anymore – the sides flopped weakly to one side like a crumpled dishrag. I reached inside to prop it up, but as soon as I let go, it collapsed again.
I almost threw this carrier away.
It wasn’t cheap when I bought it, the folding design was very convenient, and the mesh was still intact. But the sides had collapsed – it couldn’t stand on its own, and when Luna got in, the walls pressed against her back. I searched online and found this wasn’t unusual – many soft carriers “go limp” after extended use. But later I found a way to make it stand up again, without spending a cent. After five days, it regained its shape.
If you also have a “limp” soft carrier, don’t toss it yet. Try my method.
Table of Contents
The Carrier I Almost Threw Away: My Two‑Year Companion Went Limp
Why Do Soft Carriers Collapse on the Sides?
Restoration Method 1: Stuffing & Shaping (Most Effective)
Restoration Method 2: Hanging
Restoration Method 3: Heat Setting (Use with Caution)
When to Replace It: Give Up After Three Failed Attempts
Shopping Checklist: 4 Tips to Prevent Side Collapse
Frequently Asked Questions
Conclusion: A Soft Carrier Is Not Disposable
The Carrier I Almost Threw Away: My Two‑Year Companion Went Limp
That foldable carrier was the one I’d used the longest. It accompanied Luna and Tudo on many trips. It wasn’t like a heavy‑duty carrier with a metal frame, but when new, the sides were stiff – it stood on its own and had spring‑back when pressed. I used it as a backup carrier, usually folded and stored in the cupboard.
Last month, I took it out for a short trip – and was shocked. The carrier came out of the cupboard already “flat” – both sides caved in, and the top sagged. I opened it, tried to prop up the sides, but they collapsed again. When I put Luna inside, the walls pressed against her back; she twisted uncomfortably and got out.
I thought about why this happened. First, the last time I used it, I folded it and stuffed it into the cupboard, where it was pressed for months. Second, the flexible support rods inside (soft plastic strips) had been bent for so long that they lost their spring.
I had seen similar complaints in reviews:
“Sides collapse easily.”
“No structure at all.”
But my carrier wasn’t “born without structure” – it had “lost its structure over time.” It originally had support, but after long use and being stored under pressure, it gave up.
I decided to try to save it.
Why Do Soft Carriers Collapse on the Sides?
In the negative reviews I analyzed about “structural collapse / weak support,” side collapse accounted for a large proportion. But most of those reviews were about carriers that were “flimsy from day one,” whereas mine became limp over time. The causes are different.
Three main reasons for collapse over time:
1. Support rod fatigue
Many soft carriers have flexible support rods embedded in the sides or top (plastic strips, PE strips, or thin steel wire). After repeated folding and prolonged bending, these rods lose their elasticity and can’t return to their original shape. Like a drinking straw bent back and forth – eventually it stays bent.
2. Prolonged compression during storage
If, like me, you fold the carrier and stuff it into a cupboard with other things on top, after months the fabric and support rods become “set” in the compressed shape. Even when you open it, it won’t recover. It’s the same as creases in folded clothes.
3. Material aging
The carrier fabric (especially PVC‑coated or thin oxford fabric) loses its stiffness over time as fibers fatigue. A carrier that once stood on its own becomes soft, and combined with weakened support rods, it collapses completely.
Note: If your carrier was “flimsy from day one,” that’s a design flaw – no internal frame or a very weak one. Such carriers may be beyond saving. But if it “became limp after long use,” chances are good it can be restored.
Restoration Method 1: Stuffing & Shaping (Most Effective)
I tested this method and it worked well. Zero cost, just needs patience.
Principle
Keep the carrier fully stuffed for 3‑5 days, using continuous tension to “stretch” the deformed fabric and support rods back to their original shape. Similar to stuffing shoes with newspaper to reshape them.
Materials
Pillows, cushions, a comforter, old clothes – anything that can fill the carrier tightly. Stretchy fillers (pillows are best) work best.
Steps
- Empty the carrier – Remove the liner and base board completely. Leave only the empty carrier shell.
- Stuff it full – Stuff pillows or a comforter into the carrier until it is very full. The standard: the carrier walls are pushed outward from the inside, all collapsed areas are propped up, and the zipper requires a little effort to close.
Key: Don’t just stuff a little. The carrier should be stretched to “taut” – the fabric and support rods need to be under tension. - Close the zipper – Zip it shut to lock the stuffing inside.
- Leave for 3‑5 days – Place the carrier on a flat surface with nothing on top. Check daily – if the stuffing has loosened (the zipper area feels less tight), add more.
- Remove the stuffing – After 3‑5 days, open the zipper and take out the stuffing. Press the sides with your hand to feel the spring‑back.
My results
- Stuffed for 4 days using two pillows stacked together.
- After removal, the carrier stood on its own, with noticeable spring‑back when pressed.
- Not as stiff as brand new, but perfectly usable.
- When Luna went inside, the walls no longer pressed against her back.
Works for
- Support rod fatigue (plastic strips, PE strips)
- Fabric deformed by long‑term compression
Does not work for
- Broken support rods (stuffing won’t fix a break)
- Carriers that were flimsy from day one (design flaw – they will collapse again)
Restoration Method 2: Hanging
If the stuffing method doesn’t work well enough, or you want faster results, try hanging.
Principle
Use gravity to let the carrier body hang naturally, stretching the fabric and support rods vertically to restore longitudinal stiffness.
Steps
- Empty the carrier – Remove the liner and base board.
- Hang with a wide hanger – Use a wide‑shoulder hanger (preferably wooden or extra‑wide). Insert it from the bottom of the carrier to prop open the top. Alternatively, use clips to grip the top edge.
- Hang for 3‑5 days – Hang in a well‑ventilated area away from direct sunlight. Let gravity stretch the carrier naturally.
Note: Only use this method if the top of the carrier is still strong. If the top is already weak, hanging may cause it to tear.
Effectiveness
Hanging primarily addresses “vertical collapse” (sagging top). It is less effective for “side collapse” than the stuffing method. I recommend using it as a supplement – stuff first to expand, then hang to set the shape.
Restoration Method 3: Heat Setting (Use with Caution)
This method is only for specific materials. Mishandling can ruin the carrier. Read carefully.
Principle
Thermoplastic materials like EVA and PE soften when heated and retain a new shape when cooled. If your carrier’s side support rods are made of PE, you can heat them, manually reshape, and let them cool to restore stiffness.
Suitable materials
- √ EVA (expanded polyethylene)
- √ PE (polyethylene)
- × PVC (may release toxic fumes when heated)
- × Nylon / oxford fabric (fabric may shrink)
- × Steel wire (heating won’t help)
How to check: Look at the product description or hang tag. If unsure, do not use the heat setting method.
Steps (for EVA/PE only)
- Confirm the material: Locate the support rod inside the carrier side; pinch it. If it’s a soft plastic strip and the tag says EVA or PE, you can try.
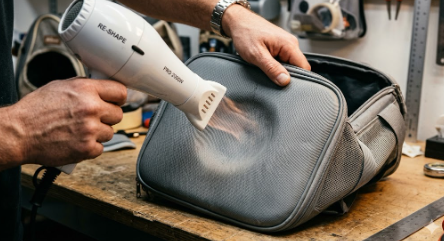
- Heat with a hair dryer: Use the hot setting, aim at the collapsed area (where the support rod is) for 1‑2 minutes, keeping the dryer 10‑15cm away. Heat until the surface is slightly warm to the touch but not hot.
- Shape manually: While still warm, use your hand to press the collapsed area into the desired shape (push it outward). Hold for 30 seconds, then let it cool.
- Check the result: After cooling, release and see if the shape holds. If needed, repeat once.
Warnings
- Do not overheat (may melt or release fumes).
- Do not apply heat directly to mesh (it may melt).
- Do not use on ordinary fabric (may shrink or wrinkle).
- If you are unsure of the material, do not use this method.
I tried heat setting once on an EVA back panel, and it worked okay. But when I tried it on a regular soft carrier, I nearly melted the mesh. So I generally don’t recommend this method for beginners. Use the stuffing method first.
When to Replace It: Give Up After Three Failed Attempts
Not every carrier can be saved. The following signs mean the carrier has reached the end of its life:
Broken support rod
If you can feel a distinct break inside the wall (a plastic rod snapped in two), stuffing won’t help. You could try opening the liner and replacing the rod, but that’s complicated. It’s usually better to replace the carrier.
Severely aged fabric
The fabric has become brittle, hard, powdery (coating flaking off), or the mesh is loose and saggy. The material itself has failed – shaping won’t help.
Collapses again after repeated restoration
After 5 days of stuffing, the carrier collapses again as soon as you remove the filler, or it collapses after a week or two of use. That means the support rods have completely lost their elasticity and cannot be revived.
Structural damage
Torn side seams, holes in the mesh, a cracked base board. Such damage may be repairable, but if it’s severe, replace the carrier.
My rule: If I stuff it once and it recovers but collapses again after 1‑2 weeks, I’ll try a second time. If it happens again, I stop and replace it.
That gray‑blue carrier I almost threw away – I saved it once with the stuffing method, and it lasted another three months. Then the sides started collapsing again. I stuffed it a second time, but it only lasted a week. I knew it was time to retire it. But those extra months were worth it.
Shopping Checklist: 4 Tips to Prevent Side Collapse
If you’re buying a new carrier and want it to resist collapse, keep these points in mind:
√ 1. Prefer a metal frame
Aluminum frame > steel wire frame > PE plastic strips > frameless. Metal frames resist fatigue far better than plastic strips and will last years without collapsing. See the earlier “structural analysis” article.
√ 2. For foldable carriers, choose “fold‑in‑half” over “roll‑up”
Fold‑in‑half designs put more even stress on the folding points, and the support rods are less likely to fatigue. Roll‑up designs require repeatedly twisting the support rods, making them fail sooner.
√ 3. Don’t store under compression for long periods
When not in use, don’t fold the carrier and stack things on top. Store it flat if possible, or at least on top of other items. If you must store it folded for a long time, stuff something inside to help it keep its shape.
√ 4. Look for follow‑up reviews (3+ months later)
Many negative reviews are written right after receipt and don’t reflect long‑term durability. Search specifically for reviews that say “after 3 months” or “after half a year” and see if they mention side collapse.
Frequently Asked Questions
Q: What’s the best material for the stuffing method?
A: Pillows are best – they are evenly stretchy. Comforters or cushions are next. Don’t use hard objects (books, boxes) – they will create sharp creases. Also avoid small lumpy things (wadded clothes) – they won’t distribute pressure evenly.
Q: Do I need to zip the carrier closed when stuffing?
A: Yes. Closing the zipper forces the stuffing to press outward in all directions. If you can’t close the zipper, you’ve overstuffed – remove a little.
Q: My carrier was flimsy from day one. Can it be saved?
A: Probably not. Flimsy from day one means it has no internal frame or a very weak one – it’s not fatigue, it’s a design flaw. Stuffing might prop it up temporarily, but as soon as you remove the stuffing, it will collapse again. Return it or choose a different model.
Q: What if I ruin the carrier with the heat setting method?
A: That’s why I said “use with caution.” If you’re unsure of the material, don’t use it. If you already damaged it (melted mesh, shrunken fabric), then you’ll have to replace it.
Q: After restoration, how long will the carrier stay upright?
A: It depends on the cause. For mild support rod fatigue, one stuffing session can last 3‑6 months. For fabric aging, it may last only a few weeks. My experience: the first restoration works best, the second works half as well, and by the third it’s essentially useless.
Conclusion: A Soft Carrier Is Not Disposable
That gray‑blue carrier I almost threw away – I saved it twice with the stuffing method. The first time lasted three months, the second time lasted one week. Although it eventually retired, it gave me an extra half‑year of use.
A soft carrier is not disposable. When the sides collapse, don’t throw it away first. Stuff it full of pillows, zip it shut, wait 3‑5 days – it may stand up again. The essence of this method is to help the deformed material “remember” its original shape. If it doesn’t recover, then it truly is time to retire it.
But at least you tried – instead of leaving it in a corner and buying a new one with regret.
Remember three things:
- The stuffing method is most effective: fill with pillows, zip shut, wait 3‑5 days.
- Long‑term compression is the enemy: when not in use, don’t crush it – store flat or stuff it.
- Don’t force a lost cause: if it fails three times, the rods are broken, or the fabric is aged – replace it.
You’re not just buying a carrier – you’re buying your pet’s “mobile room” on the road. If the walls of that room collapse, try to fix them first. If you can’t, then replace it. Every dollar is worth spending wisely.
Has your soft carrier ever collapsed? What method did you use to restore it? Share your experience in the comments.
Leave a Reply
You must be logged in to post a comment.