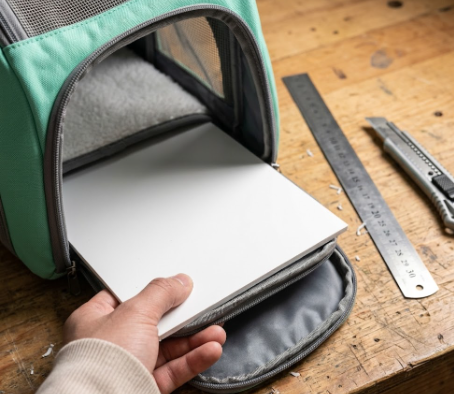
I had been using that carrier for about three months. When I bought it, the base was stiff – not as strong as the composite wood board in a heavy‑duty carrier, but it still had decent support when you pressed on it. Then one day, after lifting Tudo out of the carrier, I noticed the bottom bulging downward in the middle. When I pushed it with my hand – it was soft and saggy, like stepping on old cardboard. I removed the liner and saw that the base had already bent into a curve – the sides were raised and the middle had caved in.
Tudo weighs 11 pounds and goes in and out every day. Three months of daily use had bent that base.
The rest of the carrier was still in good shape: the mesh wasn’t torn, the zipper moved smoothly, the strap was solid. I didn’t want to just throw it away. So I started researching how to reinforce the base myself. I tried several materials, hit some snags, and eventually found the most practical method. After reinforcing it, the carrier lasted another year without the base bending again.
If you’re also dealing with a bent carrier base, don’t rush to toss the carrier. For a few dollars and half an hour, you can give it a new life.
Table of Contents
Bent After Three Months: Tudo Turned the Base Into a “Bridge”
Data‑Backed: Lessons from 236 “Insufficient Base Support” Reviews
Method 1: PVC Board Reinforcement (Most Recommended)
Method 2: Cardboard Temporary Fix (For Emergencies)
Method 3: Replacement Base (When the Original Base Is Removable)
Safety Tips: Sanding, Sizing, Regular Inspection
Frequently Asked Questions
Conclusion: The Base Is the Carrier’s Foundation
Bent After Three Months: Tudo Turned the Base Into a “Bridge”
The base of that carrier was made of composite cardboard – a thin fabric outer layer with several layers of compressed paper fibers inside. It felt stiff when new, but as soon as it got damp or compressed, it deformed quickly. When Tudo lay inside, his weight concentrated in the middle of the base, slowly pressing a depression into the cardboard. Plus, he once peed in the carrier – the liner caught most of it, but a little moisture seeped into the edge of the base. After that, it bent even faster.
I had seen similar complaints in reviews:
“The bottom bends when my dog stands.”
“It feels weak and doesn’t support my pet well.”
“Very flimsy bottom support.”
“Flimsy” – that word appears repeatedly in negative reviews about base support. It’s not that it “broke”; it’s that it “was weak to begin with.” Many pet carriers use this kind of composite cardboard for the base. It looks stiff, but after a few months it’s done.
I didn’t want to buy a new carrier. The body, mesh, and zipper of the old one were still fine – only the base was failing. I decided to fix it myself.
Data‑Backed: Lessons from 236 “Insufficient Base Support” Reviews
Among the 5,000+ negative reviews I analyzed, “insufficient base support / poor support” appeared 236 times, ranking third. Here is the breakdown of typical problems:
| Problem | Percentage | Typical Description |
|---|---|---|
| Base bent / deformed | 55% | “Sagged in the middle,” “edges curled up” |
| Base too soft | 30% | “Collapsed when pressed,” “bent when the dog stood” |
| Base cracked / broke | 15% | “Split in the middle,” “cardboard crumbled” |
User quotes:
“The bottom bends when my dog stands.”
Bends as soon as the dog stands – a sign of insufficient strength.
“It feels weak and doesn’t support my pet well.”
Poor support – a material issue.
“Very flimsy bottom support.”
“Very flimsy” – the most accurate description of cheap cardboard bases.
What the data shows:
- Average lifespan of a composite cardboard base: 3–6 months under normal use.
- Moisture (pet urine, rain) accelerates deformation, shortening lifespan to 1–2 months.
- PVC and PE board lifespan: 1–2 years – they rarely bend.
Method 1: PVC Board Reinforcement (Most Recommended)
This is the method I recommend most. PVC board is lightweight, waterproof, durable, low‑cost, and easy to work with.
Materials needed
- PVC board (also called PVC sheet or expanded PVC). Available at hardware stores or online. Choose 5mm thickness (thinner won’t support well, thicker may not fit).
- Utility knife
- Ruler or tape measure
- Sandpaper (for smoothing edges)
Cost: $2–5 (PVC board is sold by size; a piece the size of a sheet of paper costs very little; a larger carrier may cost a few dollars).
Step‑by‑step
Step 1: Measure the interior bottom of the carrier
Remove the liner and measure the length and width of the bottom inside the carrier body – the space under the liner where the base sits.
Important: Make sure the bottom is flat when measuring. Measure twice to confirm.
Step 2: Calculate the PVC board size
The PVC board should be 0.5cm (about 0.2 inches) smaller in both length and width than the interior bottom. Reason:
- Leaves room for the seam allowance – won’t stretch or tear the carrier.
- Makes it easy to insert and remove.
- Prevents the edges from rubbing against the fabric.
Formula: PVC length = interior length – 0.5cm; PVC width = interior width – 0.5cm.
Step 3: Cut the PVC board
Score the PVC board with a utility knife along a straight edge. Cut several times (score about halfway through, then snap it). You can also ask the hardware store to cut it for you (often free or a small fee).
Step 4: Sand the edges
Use sandpaper to smooth all cut edges and corners. This is very important – sharp edges can wear through the liner or the carrier fabric.
Step 5: Insert into the carrier bottom
Slide the PVC board into the bottom compartment under the liner. If your carrier doesn’t have a dedicated pocket, place it between the liner and the carrier bottom, then put the liner back on top.
Step 6: Test
Put the liner back, press the bottom with your hand to feel the support. Put your pet inside and check whether the base bends.
Test results
- With Tudo (11 lbs) standing in the reinforced carrier, the base hardly bends at all.
- After one year of use, the PVC board showed no deformation and no moisture damage.
- The overall stability of the carrier improved noticeably.
Precautions
- Don’t use PVC board thicker than 8mm – it probably won’t fit.
- Don’t drill holes in the board – that weakens it.
- If the carrier already has a base, you can remove the old one and replace it with the PVC board.
Method 2: Cardboard Temporary Fix (For Emergencies)
If you don’t have PVC board on hand or just need a quick emergency fix (e.g., you’re traveling and discover a bent base), cardboard is a zero‑cost temporary solution.
Materials needed
- Corrugated cardboard (from a shipping box – choose a thick, sturdy piece)
- Wide packing tape (clear or duct tape)
- Scissors or utility knife
Cost: $0 (cardboard from home)
Step‑by‑step
Step 1: Cut the cardboard
Cut the cardboard to the interior bottom size (or 0.5cm smaller). You can stack 2–3 layers for extra thickness and support.
Step 2: Wrap completely with tape (very important)
Wrap the entire piece of cardboard with wide packing tape, especially the edges. This is to make it water‑resistant – cardboard weakens when wet, and tape helps extend its life.
Step 3: Insert into the carrier bottom
Same as the PVC method – slide it into the bottom compartment or between the liner and the carrier body.
Pros and cons
Pros:
- Zero cost, readily available.
- Easy to cut, no special tools needed.
Cons:
- Not waterproof (even with tape, edges can still let moisture in).
- Short lifespan (1–2 months before it compresses).
- Less supportive than PVC board (especially for pets over 10 lbs).
When to use
- Emergency fix (e.g., you’re on a trip and the base fails).
- Very lightweight pet (under 5 lbs).
- As a temporary solution while waiting for PVC board to arrive.
My experience
Once, during a road trip, I noticed the base of my carrier starting to sag. There was no hardware store at the rest area. I found a cardboard box, cut two layers, wrapped them tightly in tape, and slid them under the liner. It lasted the remaining three days of the trip. When I got home, I replaced it with PVC board.
Method 3: Replacement Base (When the Original Base Is Removable)
Some pet carriers have a removable base – you unzip a compartment and pull the base out. If your carrier is designed this way, replacing the base is the simplest option.
Materials needed
- PE board (polyethylene) or PVC board. PE board is more flexible and less likely to crack, but slightly more expensive.
- Search online for: “pet carrier replacement base” or “pet carrier support board”
Cost: $3–6 (custom‑cut online)
Step‑by‑step
Step 1: Remove the old base
Open the zipper or Velcro compartment at the bottom and pull out the deformed base.
Step 2: Measure the old base
Measure the length, width, and thickness of the old base. Thickness is usually 3–5mm.
Step 3: Buy a replacement of the same size
- Online: Search for “pet carrier base replacement” – many sellers offer custom sizes. Give them the dimensions.
- Local: Buy PE or PVC board at a hardware store and cut it yourself.
Step 4: Insert the new base
The new base should be just slightly smaller (0.2–0.3cm) than the old one for a snug fit. Slide it in, then close the compartment.
Pros
- Perfect fit – no cutting needed (if you order custom size).
- You can choose a better material than the original (PE board is far better than composite cardboard).
- The carrier’s appearance remains unchanged.
Cons
- Need to wait for shipping (2–3 days).
- Requires accurate measurements.
Online ordering tips
- Tell the seller your pet’s weight (they can recommend the right thickness).
- Confirm the material (PE or PVC – not composite cardboard).
- Confirm that the edges are smoothed (no risk of damaging the carrier fabric).
Safety Tips: Sanding, Sizing, Regular Inspection
No matter which method you use, these three points are essential:
1. The edges of the hard board must be sanded smooth
PVC and PE board cut edges are very sharp. They can wear through the liner, damage the carrier fabric, or even scratch your pet. Use sandpaper to round the edges and corners.
Test: Run your finger along the edge – if it feels scratchy, sand more.
2. The board must be slightly smaller than the bottom
If the board is exactly the same size as the bottom, it will stress the seams and could tear the carrier. A 0.5cm allowance on length and width is safe. If the bottom has curved corners, round the board’s corners to match.
3. Inspect regularly for cracks
PVC board won’t absorb moisture, but long‑term weight can cause hairline cracks. Check every 3 months:
- Remove the board and look for cracks.
- Press the center to see if it still springs back.
- Check edges for wear.
Replace when: You see visible cracks, the board doesn’t spring back after pressing, or edges are badly worn.
Frequently Asked Questions
Q: Where can I buy PVC board? What thickness should I get?
A: Hardware stores (in the decorative sheet section) or online. Search for “PVC hard board 5mm”. 5mm thickness is best. 3mm is too soft; 8mm+ is too thick to fit.
Q: My carrier’s base is sewn in and can’t be removed. Can I still reinforce it?
A: Yes. After removing the liner, place the PVC board directly between the carrier bottom and the liner, then put the liner back on top. It won’t be as secure as a dedicated compartment, but it still provides support. Make sure the board edges are smooth so they don’t rub against your pet.
Q: Which is better – PE board or PVC board?
A: PE board is more flexible and less likely to crack, but costs a little more ($1–2 extra). PVC board is stiffer and provides better support, but is more brittle (may crack under heavy impact). For everyday use, both work. If your pet weighs more than 15 lbs, I recommend PE board.
Q: How long does a cardboard base last?
A: Without moisture, 1–2 months. If it gets wet (urine, rain), it may soften in days. Only for temporary emergencies.
Q: Will reinforcing the base make the carrier heavier?
A: A 5mm thick PVC board in A4 size weighs about 150–200 grams. It adds a little weight, but far less than the cost of a new carrier. The improved support and security are well worth it.
Q: My carrier already has a stiff base, but it bent. Can I just replace it instead of reinforcing it?
A: Yes. See “Method 3” – buy a replacement base (PE or PVC board) of the same size. Match the thickness so the liner sits flat.
Conclusion: The Base Is the Carrier’s Foundation
That carrier, after I replaced its base with a PVC board, lasted another full year. Tudo’s posture inside was noticeably different – before, when he stood, the bottom would sag a little and he had to brace his legs; after the rigid base, he stood steadily and lay down more comfortably. Luna, too – she used to curl up in the soft‑bottom carrier, but with the rigid base she started stretching out.
The base is the carrier’s foundation. If the foundation is unstable, nothing above it is secure. A bent base isn’t just uncomfortable for your pet – it can affect their spine and joints. But don’t rush to throw the carrier away. For a few dollars and half an hour, you can give an old carrier a new life.
Remember three things:
- PVC board is the best choice: lightweight, waterproof, durable – costs very little.
- Edges must be sanded smooth: safety first.
- Board should be slightly smaller than the bottom: leaves room for seams.
You’re not just buying a carrier – you’re buying the “floor” your pet stands on every day. How stiff and stable that floor is determines whether your pet feels secure or strained when standing, lying down, or turning around.
Next time you find a bent base, try a DIY reinforcement first. The money you save can buy your pet several bags of treats.
Have you ever dealt with a bent carrier base? Have you tried reinforcing it yourself? Share your DIY tips in the comments.
Leave a Reply
You must be logged in to post a comment.